Garry Black Photography

Tips and Techniques

WATERFALLS

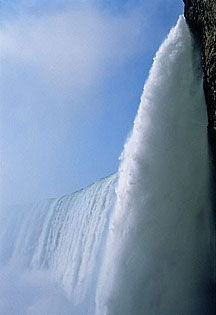
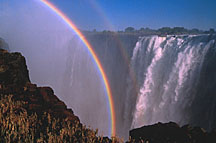
There is something about moving water that has a magnetic effect upon me. It has been with me for as long as I can remember. My earliest memories are of the North Sea at St. Andrews in Scotland, where I spent my summers. The sight and sounds of the crashing surf mesmerized me. There is something magical about moving water, it has the same effect that watching a lightning storm, a heavy rain or seeing a rainbow or large fluffy snowflakes has on us, it is the magic and wonder that Nature gives us. It evokes within us many opposing concepts and feelings: power, strength, fear, peacefulness, serenity, soothing, calmness. But there is something about waterfalls that makes us feel good, whatever this magic is, it is what lures people to waterfalls. Whether they are large, powerful ones like Niagara or Victoria Falls or small cascading brooks in a forest. Because so many people are drawn to waterfalls, they're one of the most photographed of all subjects. They're easy to find, but are also perplexing subjects to capture on film.


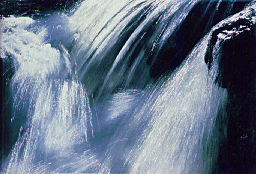
There are as many different approaches to waterfall photography, as there are waterfalls. It all depends on the effect that you wish to create and the waterfall itself. Your personal preference as to how the water should look, is just exactly that, your own personal preference! One person may say it's better to shoot using longer exposure times to make the water look silky, while another may say shoot faster to stop the action. Neither approach is wrong nor are both right. Whichever style you choose, then obviously this is the proper one for you. If your choice is for a long exposure, then the exposure time should be at least 1/4 second or longer. Normally this will mean using a small aperture (f16 or f22), by doing this you achieve two goals. One, it allows for slower speed settings making the waterfalls look silky, and two, you get as much depth of field as possible, there by allowing the maximum amount of focus - depth of field- in your composition.
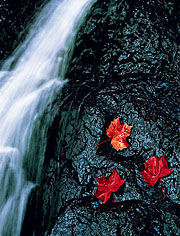
What makes photographing waterfalls tricky no matter which approach you choose, whether using short or long exposure times, is getting the proper exposure. Taking pictures of fast-moving water is quite different from shooting any other landscape. The white, bubbling water you see can fool your camera's meter as easily as snow does. How often have you gotten back slides of underexposed waterfalls and winter landscapes?


There are several ways to get a correct exposure of a waterfall, whether it is in bright sunlight or overcast conditions. One method is to take a meter reading of the two extremes of tones that you've composed in the frame and then set your meter between the two.  Another option is to find something in the frame that is middle gray (tree trunks and rocks are good examples) and take a meter reading off of them. The subject you choose to meter should be receiving the same amount and angle of light as the waterfall. The other ways are to use a gray card or a hand-held light meter.

No matter which method you choose to use, it is always a good idea to bracket your exposure. It is just not worth the time and effort required to reach the waterfall, only to take one picture of the scene, then to realize when you get your slides on the light table that your image isn't properly exposed. Take a couple of shots of each composition; going either one-half to a full stop on either side of the reading, which you think, is correct.  Quite often I find the image that I like the best may not be the "exact proper exposure" for the waterfalls but is an exposure that suites the entire scene. This is particularly true in forested areas where there is light fall-off because of the canopy of leaves overhead. There are many differing factors to consider when calculating your exposure of waterfalls, are they in heavily wooded areas or areas that allow patches of light through. Which direction does the waterfall face - the sun and/or skylight or shade. What is the volume of the running water and the degree of white in the water. These are only guidelines that give you a place to start. I find that getting the "correct" exposure for waterfalls is the most difficult of all exposure calculations.

The quality of light is perhaps the most important of all considerations when photographing waterfalls. As a general rule, I photograph waterfalls that are in the woods only on overcast or even rainy days. Here I use a slow shutter speed and a small aperture. While on the other hand I usually photograph large waterfalls in bright sunlight at shutter speeds faster than a 60th of a second. There are many exceptions to this, but it is just a general guideline that I use. With differing qualities of light you will also have to be aware of the colour temperature of the light. In overcast conditions I use a warming filter to counter balance the blue that is present, other times I will add a blue filter to enhance the blue. Experiment!
 
When considering composition of your waterfall photos, ask yourself do you want to take a picture of the entire waterfall and it's surroundings or just a portion of it? I usually start out by photographing the entire scene then work my way into smaller areas. If you want to include the entire waterfall in your composition then you will have to find the best possible vantage point that portrays the scene. Sometimes this means climbing up over rocks, crossing the stream/river only then to find that there really isn't an ideal vantage point in which to get the entire waterfall without getting a lot of distracting elements in your shot. You can try moving forward and back a bit or side to side or using a zoom lens, to clean up the edges of the frame. Generally I have found that there are many distracting objects around a waterfall. It may be difficult to get the overall shot without having to include some of them; you will probably have to compromise in your composition. But you should try to eliminate these objects as much as possible, so that they are not competitive with your main subject.

The photographs of waterfalls that I find most appealing are those that only include a small portion of the waterfall. These tend to make interesting compositions, as there are fewer elements that are distracting the viewer's attention. Water falling on a group of rocks near the bottom of the waterfall can be more effective than the entire waterfall itself. Small waterfalls and cascades are good for this, as they provide many different compositions within a small area. Here you are dealing with only a couple of elements; rocks, leaves and the water. I've been known to spend an entire day just around a cascading brook. My best advice is to move around, look at the scene through different lenses, and try various heights, right from water level to as high as you can get. The one camera position that I have found that doesn't work is looking at a cascading brook downstream (the water going away from you), it normally looks good to the eye, but it doesn't record that way on film, the results are disappointing

I find that spring and fall are the two times of year that I photograph waterfalls the most. In spring, if there has been a good winter snowfall, the volume of water going over the waterfalls is unparalleled. You can get some pretty dramatic shots of the water crashing onto the rocks and spraying up into the air. In the fall, you are bombarded with the autumn colours; it is hard to resist from including all of them into your composition. Remember that the waterfall doesn't have to be dominant in your image, in order to be effective. Since the waterfall will probably be the lightest tone in your image, the viewer's attention will be drawn to it any ways. Subjects other than just the waterfall or cascade can be the main part of your composition. Don't forget about close-ups, keep an eye out for a lone leaf or a couple of leaves on a rock in the moving waters (I've been known to replace old leaves with brightly coloured ones).
The other time of year that I find myself photographing waterfalls is in the early winter (around the Ottawa area). This is probably the most difficult time to capture them on film. As the snow, which is also a light tone competes with the waterfall for the viewer's attention. This is when I normally do close-ups of the flowing water and ice along the banks of the stream, including a thin sliver of snow along the edge of the picture. When trying to capture the entire waterfall it is best to try and find rocks in the foreground encrusted in ice or covered with snow.

Now get out to your favourite waterfall or brook, try some of these techniques and don't be afraid to get your tripod legs or your feet wet (wear rubber boots!).


WORKSHOPS - HOME - TIPS & TECHNIQUES